Ever see those really pretty flowers painted with just a few swoops of color and think, ‘No way, I could never do that’? Well, guess what? You totally can! This guide is all about one stroke painting flowers for beginners. We’re going to break down how to get those beautiful, blended looks using just one brush and a couple of colors. It’s simpler than you think, and honestly, it’s pretty fun once you get the hang of it. We’ll cover everything from loading your brush to making petals and leaves, so you can start creating your own floral art without a lot of fuss.
Key Takeaways
- The flat brush is your best friend for one stroke painting flowers because it holds two colors and makes smooth transitions.
- Double-loading your brush with two colors allows for effortless blending and natural-looking gradients right on the brush.
- Creating a rose involves layering simple strokes, starting with larger outer petals and moving to smaller inner ones for depth.
- Leaves are painted using the edge of the loaded brush, and stems can be added with a thin stroke.
- This method simplifies complex floral designs, helping beginners build confidence and achieve beautiful results quickly.
Understanding The One Stroke Method

Why The Flat Brush Is Essential
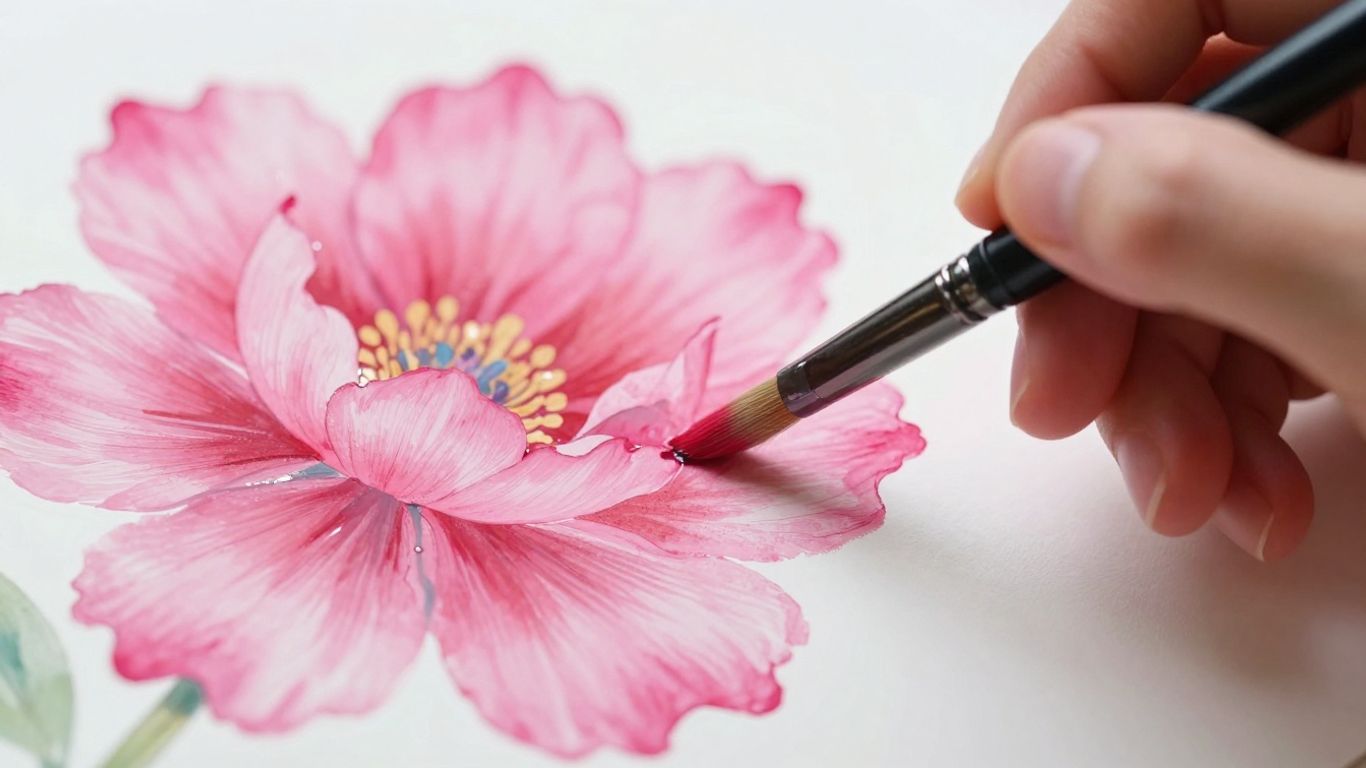
The flat brush is your best friend for this kind of painting. It’s not just any brush; its shape is key. The wide, flat side lets you load up two different colors side-by-side, which is the whole point of the one-stroke method. When you press this loaded brush onto your surface, the colors blend just enough to create a beautiful gradient, all in one go. This means you get smooth transitions from dark to light, or from one hue to another, without having to stop and mix colors on your palette or try to blend them on the paper. The sharp edges of the flat brush also let you make crisp lines for petals and leaves, and you can use the side for broader strokes. It really simplifies things, letting you create whole shapes with just one movement.
Effortless Blending With Double-Loading
Double-loading is the magic trick here. You load one side of your flat brush with one color and the other side with a different color. Think of loading a deep red on one corner and a bright pink on the other. Then, you gently sweep the brush back and forth on your palette. This isn’t about mixing the colors completely; it’s about softening the edge where they meet. When you then press that brush down to make a stroke, you get a beautiful, natural blend right on your canvas or paper. It looks like you spent ages blending, but it happens in a single stroke. This technique is what gives one-stroke flowers their realistic depth and soft appearance.
Achieving Natural Gradients
Getting those soft color shifts, or gradients, is what makes one-stroke flowers look so alive. With double-loading, you’re essentially pre-mixing your colors on the brush. As you paint a petal, the darker color might be on the outside edge, fading into a lighter color towards the center, or vice versa. This mimics how real petals look, with natural light and shadow. It’s not about perfect, even color; it’s about that subtle shift that adds dimension. You can control how much blend you get by how much you sweep the brush on the palette and how you press it down as you paint. It’s a simple technique that gives a really sophisticated look.
The beauty of the one-stroke method lies in its ability to create complex-looking results with very simple actions. It’s about using the tools and colors in a smart way to get the most visual impact with the least amount of effort.
Painting The Rose: Step-By-Step

Now that we’ve got the basics down, let’s get to the fun part: actually painting a rose! This is where the magic of the one-stroke method really shines. It might seem a little tricky at first, but trust me, once you get the hang of it, you’ll be making beautiful roses in no time. We’ll break it down into a few simple steps.
Loading Your Brush With Two Colors
This is the heart of the one-stroke technique. You’ll need your flat brush and two colors that look good together, like a deep red and a lighter pink, or maybe a bright yellow and a softer orange. Pick up one color on one side of your brush and the other color on the opposite side. Then, gently swipe the brush back and forth on your palette. You’re not trying to mix them completely; you just want a nice, soft blend where the colors meet. This gives you that lovely gradient effect that makes the petals look so real.
- Load one side of the brush with your darker color.
- Load the other side with your lighter color.
- Gently swirl on the palette to blend the edges.
The goal here isn’t to create a muddy mess, but a smooth transition that will give your petals dimension right from the start.
Creating The Outer Petals
For the first layer of petals, we want big, sweeping strokes. Think of the outside of a blooming rose. You’ll start with your loaded brush and make a curved stroke, pressing down a bit more at the beginning and then lifting as you finish the curve. It should look like a wide ‘C’ shape, or maybe a bit like a comma. Don’t worry about making them perfect or perfectly round. Leave a little space between each stroke; this helps create that natural, open look. If your strokes feel too stiff, try adding a bit more curve and easing up on the pressure as you finish the stroke.
Building Depth With Middle Petals
Once the outer layer is done, it’s time to add the petals that give the rose its depth. These are going to be smaller and a bit more tucked in. You’ll use similar curved strokes, but they’ll be shorter and a little tighter. Imagine you’re painting petals that are curling inward towards the center of the rose. You can overlap these slightly with the outer petals. Try tilting your brush a little as you make these strokes; it helps them look more natural and less like they’re just sitting on top. This is where the rose starts to really take shape and look less flat.
Adding The Rose Center And Details
Getting the middle of the rose right brings your flower to life. The center, sometimes called the bud, has its own shape and texture compared to the outer petals. With just a few well-placed strokes, you can show off that detail and make your bloom stand out.
Painting The Delicate Rose Bud
- Start by double-loading your flat brush with a tiny bit more of the lighter color (usually white or very pale pink).
- Place the tip of your brush at the center of your rose and make an inverted "U" shape gently—this creates a rounded, enclosed feel.
- Right above that, add a smaller, upright "U" stroke. It should sit on top of your first mark and close off the bud shape.
- If you want to take it up a notch, pop in a tiny comma stroke or even a dot in the middle to highlight where new petals are just opening.
Tending to the rose center is where you get that realistic, blooming appearance—don’t rush it, but don’t overthink it either. Try to keep your hand light and let the brush do the work.
Adding Dimension With Small Strokes
- Use a detail brush or the very tip of your flat brush for this step.
- With a bit more of the darker color, add some curved lines around the bud—think of them as tiny folds and twists right where petals overlap.
- A little goes a long way. Aim for two or three marks that suggest movement and depth.
- Step back for a moment after these details to make sure nothing looks heavy or overdone.
Details matter most in the center because that’s where our eye naturally lands. By focusing on a few small touches, beginners can quickly improve their painting confidence. If you want more ideas for building out rose centers, you can find helpful methods in this step-by-step rose sketching process.
Now your rose has a visible heart and some personality, setting the stage for the leafy accents next!
Completing Your Floral Design
Painting Leaves With The Brush Edge
Now that your rose is looking pretty good, let’s add some greenery to make it pop. You’ll want to rinse your brush really well after painting the rose. Then, load it up again, this time with two shades of green. A darker green on one side and a lighter, maybe yellowish-green on the other works great. To make the leaves, you’re going to use the side edge of your flat brush. Just press down a bit, curve your stroke like you’re making a little arc, and then lift off. This gives you a nice, pointed leaf shape. Try adding two or three of these leaves around the base of your rose. They don’t need to be perfect; a little variation makes them look more natural.
Adding A Soft Stem
For the stem, you can use that same loaded brush. Just use the very thin edge of the brush – the part where the bristles are closest together – and pull a gentle line down from your rose. You don’t need to press hard at all. A light touch will give you a soft, subtle stem that doesn’t overpower the flower. It’s all about adding just enough to ground your design without making it look too heavy.
Optional Fine Detail Work
If you’re feeling a bit fancy, or just want to add that extra touch, there are a couple of things you can do. You can use the corner of your brush to add a few little lines on the leaves, like veins. Or, if you have a really fine liner brush handy, you could use that with a dark green to draw in some delicate veins. Sometimes, just a tiny little comma stroke on the rose bud itself can add a bit more depth. These little extras are totally optional, but they can really make your painting look more finished and professional. It’s amazing what a few small marks can do!
Remember, the goal with one-stroke painting is to get a lot of effect with minimal effort. Don’t get bogged down in trying to make every single detail perfect. Focus on the flow and the color blending that the technique naturally provides.
Recap: The Magic Of One Stroke
Simplified Complexity
So, we’ve gone through painting a whole flower, and it might seem like a lot, but the one stroke method really breaks it down. What looks like a complicated bloom is actually just a series of simple movements. The real trick is in how you load your brush. That double-loading technique is where the magic happens, giving you those smooth color transitions without you having to do any extra blending work on the paper. It’s like having a built-in gradient maker right on your brush.
Benefits Of A Single Loaded Brush
Using just one brush, loaded with two colors, cuts down on a lot of fuss. You don’t need a whole collection of brushes to get different effects. This one flat brush can do it all:
- Create wide, curved petals.
- Form delicate, smaller petals.
- Paint pointed leaves using just the edge.
- Pull a soft stem.
It really streamlines the whole process, making it less about gathering supplies and more about just painting.
Building Confidence Quickly
This method is fantastic for anyone just starting out. Because you get such nice results with relatively simple steps, you build confidence fast. Seeing a pretty flower come together stroke by stroke is really rewarding. It shows you that you can create beautiful art without needing years of practice or a huge art studio.
The beauty of the one stroke technique lies in its ability to make complex forms accessible. By mastering the simple act of loading your brush with two colors, you gain the power to produce art that appears intricate and skillfully rendered, all while keeping the process straightforward and enjoyable.
It’s a great way to get into painting and feel like you’re accomplishing something right from the first try.
Keep Painting!
So there you have it! You’ve just learned how to paint pretty flowers using just one brush and a couple of colors. It might seem a little tricky at first, but honestly, it gets easier with practice. Don’t worry if your first few tries aren’t perfect; that’s totally normal. Just keep playing around with the colors and the brush strokes. You’ll be creating beautiful floral art in no time, and it’s a really fun way to relax and make something nice. Happy painting!
Frequently Asked Questions
What is the One Stroke painting method?
The One Stroke method is a cool way to paint flowers using just a flat brush and two colors. You load both sides of the brush with different colors, and when you paint, the colors blend together on the surface, creating beautiful gradients and dimension in a single stroke. It makes painting look fancy without being super hard!
Why is a flat brush so important for this technique?
A flat brush is key because it has a wide side and a thin edge. This lets you make both thick and thin lines. Plus, its shape is perfect for holding two colors at once, which is how you get those amazing blended effects without needing to mix colors on your palette all the time. It’s like having multiple brushes in one!
How do I load my brush with two colors?
To load your brush, dip one side into a darker color and the other side into a lighter color. Then, gently swipe the brush back and forth on your paint palette. This softens the line where the two colors meet, getting it ready to create smooth color changes when you paint.
What if my flower petals look too square?
If your petals are looking a bit blocky, try adding more curve to your brush stroke. Also, ease up on the pressure as you finish your stroke. Think about making a smooth, rounded shape rather than a straight line. A little practice with the brush movement will help a lot!
Can I use this method for other flowers, not just roses?
Absolutely! While this guide focuses on roses, the One Stroke technique is fantastic for many types of flowers. You can adjust the shapes and colors to create daisies, tulips, and more. Once you get the hang of loading the brush and making basic strokes, you can experiment with different floral designs.
What are the main benefits of learning the One Stroke method?
The biggest plus is that it makes complex-looking art much simpler. You can create beautiful, layered effects with just one brush loaded with two colors. It’s a great way to build your painting confidence quickly because you see impressive results without a lot of complicated steps or tool switching. Plus, it’s really fun!


Leave a Reply