

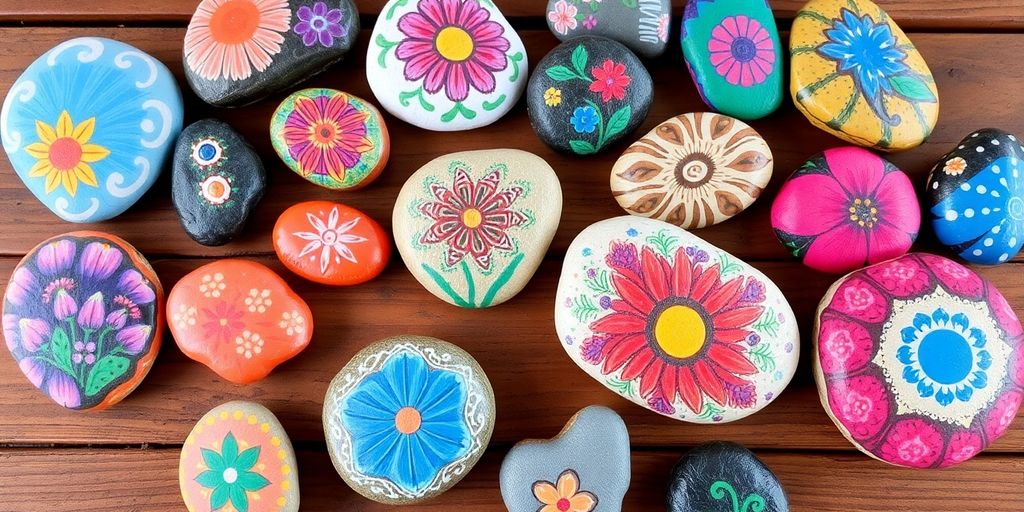
Rocks painting is more than just a hobby; it’s a fun way to express yourself and get creative. Whether you’re a total newbie or have some experience, this guide will help you explore the colorful world of painting stones. In 2025, let’s dive into the essentials, techniques, and ideas that will inspire you to turn ordinary rocks into stunning pieces of art that you can enjoy or share with others.
Key Takeaways
- Start with the right materials to make your rocks painting experience enjoyable.
- Try different painting techniques to improve your skills and add depth to your designs.
- Get inspired by seasonal themes and quotes for your projects.
- Don’t be afraid to make mistakes; they can lead to unique creations.
- Consider joining a community to share your art and learn from others.
Essential Materials for Rocks Painting
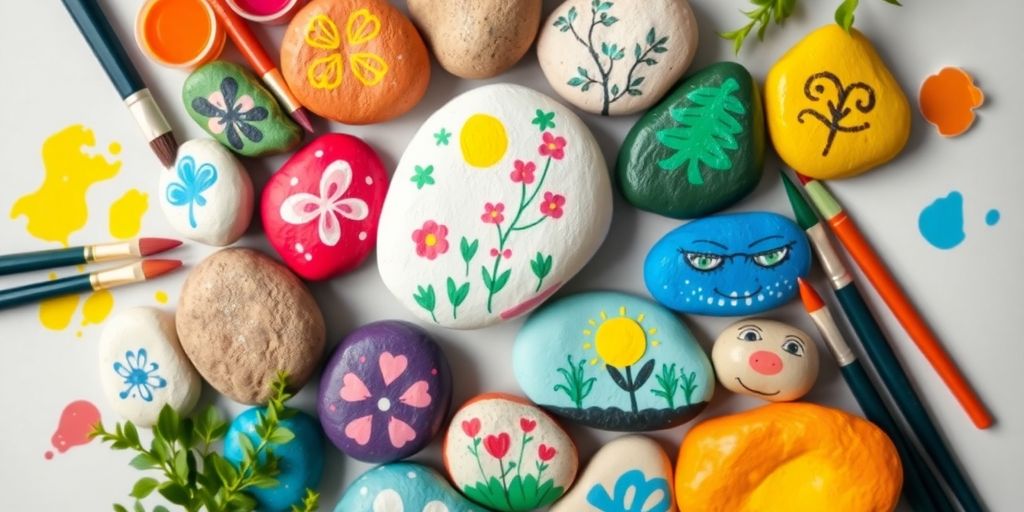
So, you’re ready to jump into the world of rock painting? Awesome! Before you start creating masterpieces, you’ll need to gather some supplies. Don’t worry, you probably have some of this stuff lying around already. Let’s break down the essentials.
Choosing the Right Rocks
Okay, this might seem obvious, but not all rocks are created equal! You want smooth, relatively flat rocks for easy painting. River rocks are usually a good bet. The size depends on what you want to paint, but palm-sized rocks are a great starting point.
Here’s a quick guide:
- Smoothness: The smoother, the better for detailed work.
- Shape: Flatter surfaces are easier to paint on.
- Size: Start with smaller rocks until you get the hang of it.
I usually collect my rocks from local parks or beaches (where it’s allowed, of course!). Just make sure to give them a good scrub with soap and water before you start painting. You can even buy rocks online if you’re feeling lazy!
Recommended Paints and Brushes
Acrylic paints are your best friend here. They’re affordable, dry quickly, and come in a ton of colors. For brushes, get a variety of sizes – small ones for details and larger ones for filling in backgrounds. DIY guide will help you get started.
Here’s a list of what I recommend:
- Acrylic Paints: A basic set with primary colors, black, and white is a good start.
- Paint Pens: These are amazing for fine details and lettering.
- Brushes: A set with various sizes, including fine-tipped brushes.
Sealers and Finishing Touches
Once you’ve painted your rocks, you’ll want to protect your artwork with a sealer. This will prevent the paint from chipping or fading, especially if you plan to leave your rocks outdoors. Mod Podge is a popular choice, but there are other options too. A good sealer will make your painted rocks last longer.
Consider these options:
- Acrylic Sealers: These come in spray or brush-on formulas.
- Mod Podge: A versatile option for sealing and adding a glossy finish.
- UV-Resistant Sealers: Ideal for rocks that will be exposed to sunlight.
Techniques to Enhance Your Rocks Painting
Basic Painting Techniques
Okay, so you’ve got your rocks and your paints. Now what? Let’s start with the basics. First, always make sure your rock is clean and dry. A quick wash and air dry usually does the trick. Then, think about your base coat. A light color, like white or cream, can really help your colors pop. I usually do two thin coats rather than one thick one to avoid drips. Remember to let each coat dry completely before adding another. It’s all about patience, which I sometimes lack, but it makes a difference!
- Clean and dry your rocks thoroughly.
- Apply a light-colored base coat (two thin coats are better).
- Let each coat dry completely.
Advanced Techniques for Detail
Ready to take things up a notch? This is where it gets fun! For fine details, invest in some really small brushes. I’m talking tiny! A liner brush is great for thin lines, and a detail brush is perfect for adding small dots or intricate patterns. Also, consider using paint pens for super precise work. They’re a game-changer. Don’t be afraid to experiment with different techniques like stippling (dotting) or dry brushing (using a brush with very little paint for a textured look). The key is practice, practice, practice.
- Use fine detail brushes for intricate work.
- Consider paint pens for precise lines.
- Experiment with stippling and dry brushing.
Layering and Blending Colors
Layering and blending can add depth and dimension to your rock paintings. Start with your lightest colors and gradually add darker shades. For blending, work while the paint is still wet. Use a soft brush to gently blend the edges of the colors together. If you want to create a gradient effect, try using a sponge. Dab the paint onto the rock, gradually lightening the pressure as you move across the surface. It takes some practice to get it right, but the results are worth it. For better coverage, apply a base coat.
Layering and blending colors can really make your rock paintings stand out. Start with light colors and gradually add darker shades. Use a soft brush to blend while the paint is still wet, or try a sponge for a gradient effect. It might take some practice, but the results are worth it.
Creative Ideas for Rocks Painting Projects
Seasonal Themes and Holidays
Okay, so you’re staring at a pile of rocks and wondering what to paint? Let’s start with the obvious: seasons and holidays! Think about it – Easter rock painting ideas are super popular in the spring. You could do colorful eggs, cute bunnies, or even little chicks. For summer, maybe some beach scenes, sunshine, or watermelon slices. Fall screams pumpkins, leaves, and spooky ghosts for Halloween. And winter? Snowflakes, snowmen, and festive Christmas trees are always a hit. It’s a great way to get into the spirit of the season and spread some cheer.
- Easter: Eggs, bunnies, chicks
- Summer: Beach scenes, suns, watermelons
- Fall: Pumpkins, leaves, ghosts
- Winter: Snowflakes, snowmen, Christmas trees
Inspirational Quotes and Messages
Sometimes, a little inspiration is all you need. Painting rocks with quotes or positive messages is a fantastic way to brighten someone’s day. You could paint simple phrases like "Be Kind," "Dream Big," or "You Got This." Or, if you’re feeling fancy, try a longer quote from your favorite book or movie. These rocks are perfect for leaving around town for people to find, or for gifting to friends and family who need a little pick-me-up. It’s like spreading happiness, one rock at a time.
I love leaving these around my neighborhood. It’s a small thing, but it makes me feel good knowing I might make someone smile.
Nature-Inspired Designs
If you’re stuck for ideas, look no further than the great outdoors! Nature provides endless inspiration for rock painting. Think about painting flowers, trees, animals, or landscapes. You could try a detailed portrait of your pet, a simple daisy, or a whole mountain range. The possibilities are endless. Plus, nature-themed rocks look great in gardens, on windowsills, or anywhere you want to bring a little bit of the outdoors inside.
Here are some ideas:
- Flowers (roses, daisies, sunflowers)
- Animals (birds, butterflies, ladybugs)
- Landscapes (mountains, forests, beaches)
Tips for Beginners in Rocks Painting
Getting Started with Simple Designs
When I first tried painting on rocks, I grabbed a brush and some paint and felt totally lost. Here’s a simple way in:
- Choose a smooth, flat rock—river stones work great.
- Wash it well, let it dry, then wipe off any dust.
- Use a pencil or chalk to sketch basic shapes like dots, stripes, or smiley faces.
- Paint in thin layers, letting each coat dry before adding details.
If you need more ideas to spark your creativity, check out these spring painting ideas for easy themes and patterns.
Common Mistakes to Avoid
You’ll learn a lot by messing up—been there, done that. Here are a few hiccups you can dodge with easy fixes:
| Mistake | Quick Fix |
|---|---|
| Paint pooling or runs | Apply thinner coats |
| Rough rock surface | Sand or prime before painting |
| Skipping the sealer | Always finish with a clear spray or varnish |
| Using old paint | Check date; toss dried-out bottles |
Finding Your Unique Style
Nobody expects you to copy the Mona Lisa on a pebble. It’s more about what feels right to you. Here are some ways to land on your own look:
- Mix colors you love on a palette before touching the rock.
- Try different brush tips: toothpicks for dots, sponges for texture.
- Keep a small sketchbook or photo folder of patterns you like.
Painting rocks is like having a tiny canvas in your hand—mess around until something clicks.
Give yourself time to make mistakes—it’s part of the fun.
Incorporating Rocks Painting into Your Lifestyle
Okay, so you’re painting rocks. Now what? It’s time to think about how this fun hobby can actually become a part of your everyday life. It’s more than just a craft; it can be a way to de-stress, connect with others, and even spruce up your surroundings. Let’s explore some ideas.
Using Painted Rocks as Home Decor
Tired of the same old boring shelves? Painted rocks can add a pop of color and personality to any room. Think of them as mini art installations. You can use them as paperweights, shelf decorations, or even create a rock garden indoors. I’ve got a friend who uses her painted rocks as unique place card holders for dinner parties – super cute and a great conversation starter! You can even use rocks in front yard landscaping to add a personal touch to your outdoor space.
Gifting Painted Rocks to Loved Ones
Forget generic store-bought gifts! A hand-painted rock is a thoughtful and unique present that shows you put time and effort into it. It’s perfect for birthdays, holidays, or just because. I made a set of rocks with inspirational quotes for my mom last Mother’s Day, and she absolutely loved them. It’s the kind of gift that people actually cherish because it’s personal.
Here are some gifting ideas:
- Pet Rocks: Paint rocks to resemble a friend’s pet.
- Inspirational Rocks: Add uplifting messages for encouragement.
- Themed Rocks: Create rocks based on a person’s hobbies or interests.
Creating a Community Rocks Painting Group
Rocks painting is even more fun when you share it with others. Starting a local rocks painting group is a great way to meet new people, share ideas, and spread some joy in your community. You can organize painting sessions in parks, community centers, or even someone’s backyard. Plus, it’s a fantastic way to get kids involved in art and nature. I’ve seen groups that hide their painted rocks around town for others to find, which is such a cool way to brighten someone’s day.
Rocks painting isn’t just a solitary activity; it’s a way to connect with others and bring a little bit of art into the world. Whether you’re decorating your home, gifting personalized creations, or starting a community group, the possibilities are endless. So grab your paints and get ready to spread some rockin’ cheer!
Exploring the Therapeutic Benefits of Rocks Painting
Rocks painting isn’t just a fun hobby; it can also be really good for your mental and emotional well-being. It’s a chance to slow down, focus, and get creative, which can be a welcome break from the stresses of everyday life. Plus, there’s something really satisfying about turning a plain rock into a little work of art. Let’s look at some of the specific ways rocks painting can help you feel better.
Mindfulness and Relaxation Techniques
Rocks painting can be a great way to practice mindfulness. When you’re focused on the colors, the brushstrokes, and the details of your design, you’re fully present in the moment. This can help quiet your mind and reduce feelings of anxiety or stress. It’s like a mini-meditation session where you end up with something beautiful at the end. I find that putting on some music and just letting my creativity flow is a great way to unwind after a long day. It’s way better than scrolling through social media!
Art Therapy and Self-Expression
Art, in general, is a fantastic outlet for self-expression, and rocks painting is no exception. It allows you to communicate feelings and ideas that you might have trouble putting into words. You can experiment with different colors, patterns, and designs to reflect your mood or personality. It’s a safe and non-judgmental way to explore your inner world. Plus, you don’t need any special skills or training to get started. Just grab a rock and some paint, and see where your imagination takes you. It’s amazing what you can create when you let go of expectations and just have fun. For older adults, painting offers numerous benefits that can improve their overall well-being.
Building Confidence Through Creativity
Completing a rocks painting project, no matter how simple, can give you a real sense of accomplishment. Seeing something you created with your own hands can boost your self-esteem and confidence. It’s a reminder that you’re capable of creating something beautiful and unique. And the more you practice, the better you’ll get, which will further enhance your confidence. I remember when I first started, my rocks looked pretty rough, but I kept at it, and now I’m actually proud of some of my creations. It’s a great feeling!
Rocks painting is a simple yet powerful way to tap into your creativity, reduce stress, and boost your overall well-being. It’s an activity that anyone can enjoy, regardless of age or skill level. So why not give it a try? You might be surprised at how much you enjoy it and how good it makes you feel.
Turning Rocks Painting into a Business Opportunity
So, you’ve got a knack for painting rocks and people are actually complimenting your work? Maybe it’s time to think about turning that hobby into some extra cash. It’s not always easy, but with a little effort, you can totally make it happen.
Selling Your Art Online
Setting up shop online is probably the easiest way to start. Platforms like Etsy are perfect for handmade goods, and there are tons of other sites geared toward artists. Here’s what you gotta do:
- Take really good photos of your rocks. Lighting is key!
- Write detailed descriptions. Include the size, materials, and inspiration behind each piece.
- Price your work fairly. Check out what other rock painters are charging to get an idea.
- Promote your shop on social media. Instagram and Pinterest are your best friends.
Don’t forget about shipping costs! Factor those into your prices so you don’t end up losing money. Also, be prepared to deal with customer inquiries and maybe even some returns. It’s all part of the game.
Participating in Local Craft Fairs
Craft fairs are a great way to connect with customers in person and get immediate feedback on your art. Plus, it’s fun! Here’s how to make the most of it:
- Find local fairs and markets in your area. Check community bulletin boards and online event calendars.
- Prepare your display. Make it eye-catching and professional. Think about using risers to showcase your rocks at different heights.
- Bring plenty of business cards. Even if people don’t buy something on the spot, they might contact you later.
- Be friendly and approachable. Talk to people about your art and your process. Share your passion!
Marketing Your Rocks Painting Skills
Beyond just selling individual rocks, think about offering your skills for custom projects or workshops. This can open up new revenue streams and help you reach a wider audience. Consider these options:
- Offer custom painted rocks for events like weddings or birthdays. Personalized gifts are always a hit.
- Teach rocks painting workshops at community centers or libraries. Share your knowledge and inspire others.
- Create a rock painting tutorial and sell it as a digital download. This is a great way to earn passive income.
- Partner with local businesses to create unique promotional items. Think painted rocks with company logos.
| Service | Price Range | Description |
|---|---|---|
| Custom Painted Rock | $15 – $50 | Personalized designs based on customer requests. |
| Rocks Painting Workshop | $30 – $60 | Group class teaching basic rocks painting techniques. |
| Digital Tutorial Download | $10 – $20 | Step-by-step guide with photos and instructions. |
Wrap-Up: Your Journey in Rock Painting Awaits
So there you have it! Rock painting is not just a fun hobby; it’s a way to express yourself and maybe even make some cool gifts. Whether you’re just starting out or you’ve been at it for a while, there’s always something new to try. Remember, it’s all about having fun and letting your creativity flow. Don’t stress about making everything perfect. Grab some rocks, your paints, and just go for it! Who knows? You might just create your next favorite piece of art. Happy painting!
Frequently Asked Questions
What materials do I need to start painting rocks?
To begin rock painting, you’ll need some smooth stones, acrylic paints, brushes, and a sealant to protect your art.
Can I use any type of paint for rock painting?
It’s best to use acrylic paint because it sticks well to rocks and dries quickly.
What are some easy designs for beginners?
Simple designs like dots, stripes, or basic shapes are great for beginners to try.
How do I make my painted rocks last longer?
After painting, apply a sealant to protect your rocks from rain and sun.
Can I sell my painted rocks?
Yes! Many people sell their painted rocks online or at local craft fairs.
Is rock painting a good way to relax?
Absolutely! Painting rocks can be a fun and calming activity that helps reduce stress.


Leave a comment